| Category / Domain : | 3D |
| SCOL Voy@ger Compatibility : | V 3.1 or above |
| Update : | 2001/10 |
The C3d3 module is the main module of any site 3D SCOL . It is from its
editor that are managed objects, textures, effects (with the help of instances)
and parameters that will be detailed in this page.
If several different 3D scenes are wished, it is possible to integrate several
C3D3 modules into the same site. In such a case, each has to be differently named.
When the module is called, two windows appear :

a) - A module editor, traditional interface to setup the cell : the C3D3 editor ; from it, it’s possible to access to 8 topics with the help of the menu
b) - A visualisation window of the 3d scene in which it is possible to move in the same way as in an on-line Scol site.
It allows to display the scene and the objects but not effects. When we move the cursor, this one transforms itself as a hand when we go over a texture
or an object where a link has been defined.
To select an object, double-click or right-click on the wished object.
It is to note that the selected material depends on the place where the click is made.
A selected object is represented by a grey box twinkling around it.
The camera represents the 3D view ; this view can be moved.
Each rubric is detailed underneath and corresponds to a tab index
of the pop-up menu located at the top of the edition window. When opening, the tab "Objets"
is activated.
Note that numerous functions are available in the 3D Edition too.
Shortcuts : Objects ¦ Links ¦ Positions ¦ Anchors ¦ Observator ¦ Instances ¦ Plugins ¦ Advanced ¦ 3D Edition ¦ Implementation
3 mains zones are included in the interface of the Objects rubric :

(1) : Objects and materials lists
(2) : Management of objects, collision boxes and lights
(3) : Tools acting on the materials of the selected 3D object.
1 - Objects and materials lists :
The Object list shows the tree of objects forming a scene :
Take care of two following elements :
- One or several father element(s) : it is the .m3d file, ie an element which contains 3D objects.
- The name of a father element can not be changed.
- Object(s) : These are the objects which compose a particular scene and are childs of a father
element.
- A click on an object allows to select this object.
- A right-click allows to display a context-sensitive menu (see 3D Editor paragraph)
- The "Materials" field displays the list of the selected object's materials.
- A material = a flat color + a texture ( bitmap ) + a lighting + an effect (Gouraud, ...).
Reminder : A file .m3d is a file containing the descriptions of 3D objects and their materials, camera, light … Refer to the SCOL tutorial for more information.
2 - The management of objects, collision boxes and lights :
It is possible to add, to rename or to delete 3D objects, to add lights and
to add / to remove collision boxes around these objects.
Reminder : A 3D object is an element made of several faces to which are
applied various materials.
| |
Adds a .m3d file
to the scene :
2. Selects an object. A thumbnail represents it below to the left, with the default textures. Black bitmap means default textures are not created. |
| |
Deletes a .m3d file (and all its child objects). |
| |
Changes the name of a 3D object (the name of a main element can not be changed). |
| |
Allows
the creation of an object "AMBIENT_x " aimed at light effects within the cell.
Direct the arrow by right-clicking, and choose "Open object editor"
(see 3D Editor title)
To regulate the light density, use the "Rename" button and change the light scale going from 0 to 31 ( by default, the AMBIANT object’s light scale is fixed to 8, thus "AMBIENT_8"). We can also define an object PARA, OMNI or SPOT by renaming the object and giving it a value from 0 to 31. For more details, refer to the help file of the LIGHTS plugin. |
| |
Non-textured invisible object which aims to affect light and orientation of objects. Dummies are child without subclass and can be renamed. |
| |
Allows to enlarge or to reduce the size of an object or a dummy : - Select the object. Click on the "Scale" button. Choose a new value in the window which opens (100 is value by default) in % of the initial size defined in the .m3d file. (200 = 2x bigger; 50 = 1/2 of the original size). Be careful not to blow the objects too much so that avatars can move around. |
| |
To create a collision box by exclusion on the selected object : (Box) appears then to the right of the object name in the Objects column. Avatars will not be able to go through objects with collision box. |
| |
This option allows to deactivate the collision tests when moving inside the 3D view of the editor ; this option only runs in the editor to facilitate objects movement and manipulation. It is without effect on the on-line site. |
3 - Tools acting on the materials of the selected 3D object :
| |
Allows to modify the texture
affected to the selected object, with the help of a window "Edit mat***" :
-The "Edit mat***" window opens if the chosen object is textured :
"Convert Bmp to Jpeg" : Allows to convert a .BMP file to a.JPG file with the aim to reduce file size. Worse quality obtained with the JPEG file can disrupt some effects applied to this texture (data loss beetween BMP and JPEG).
"Change" : Allows the change of a texture ; a window which allows to select textures opens.
Selects a texture (displayed as a thumbnail at the bottom left part).Click on OK button to confirm. |
| |
Allows to affect a color and not a texture to an object ; the Flat color is useful because it used to represent an object in the 3D space while loading textures (this only occurs at the very first connection to the site). If a .m3d file does not include a texture, the object will be displayed with this color. |
| |
Offers the possibility to set
up the filters on a color, the rotation, the saturation and the attraction color.
The "Filter selection" window opens (only the marked filters are used) :
Color Filter :
allows to color the selected texture
Rotation Filter :
allows to choose a hue to tint the texture
Saturation Filter :
allows to choose the saturation of colors composing the selected texture, ie how pure are the hues
Attraction Filter :
allows to define a color which will seem transparent (to use jointly with "Transparence")
Confirm changes by clicking on OK button. |
| |
Allows to set up the degree transparency of the selected material :
- Slide the green cursor to adjust
the transparency/opacity The transparency of a BMP texture (color of the first pixel at the top left part) is obtained by ticking "Set transparent" and leaving the cursor on 0. For a JPEG texture, it is necessary to associate a chosen color filter to set up the transparency. |
| |
Activates or deactivates main lighting effect on the selected texture. Activated : the lighting of the material depends on the scene's main lighting. Deactivated : the material is self-enlightened. |
| |
Apply a "Gouraud" effect to the selected texture ; "Gouraud" effect is a smoothing technique with improved realism by using color interpolation between two facets. |
| |
Apply a "mapping of surrounding space" to the selected texture ; this produces an effect of metal reflection (mirror effect). |
BACK TO THE Configuration MENU.

Using this editor, links can be defined on objects' textures and also can be used with plugins and modules through their actions and events.
(1) : Add = > Select an object with or without its material. This function
allows to create a link into the C3D3 module on the object or his material ;
when this link will be clicked,
it will launch an action, for example. Modules
and\or instances such as Target, Trajectory, SlideT2, Shift, Rotate, Distance... use this link to function.
(2) : Remove = > Deletes the selected link.
(3) : Rename = > Allows to change the link's name.
(4) : Visibility = > Activates or disactivates the link’s visibility : if the link is visible, the mouse’s arrow becomes a hand when it passes over the link. If it is non active, the cursor doesn’t change appearence. This function allows, for example, to hide a secret passage, or to force avatars to search for a link.
BACK TO THE Configuration MENU.
This rubric is a Positions manager in the 3D scene.
ATTENTION : a position is characterized with 3D coordinates x, y, z (spatial
positions) and a, b, c (angular positions).

Zone ( 1 ) : Camera
Add Camera Position = > Allows to save the space’s coordinates
(x,y,z) of the cuerrent position of the camera in the 3D Editor window.
This position will, , define the entry point in a room, for example. Move around into the 3D scene and define a
position, then click "Ajouter Position Camera" and enter a name such as pos_intstart,
for example, which corresponds to the start position of the interior cell.
Update Camera Position = > Allows to update the selected position
coordinates : move an object and press on "Maj Position Camera" to update its coordinates .
Force the camera in Position = > Allows to move the camera of
the 3D sight in the coordinates of the selected position : to select position
in the list, then click on "Déplacer la caméra à la Position" and the camera
will move on the selected position.
Zone ( 2 ) : Objects
Add Object Position = >
Allows to save the position of a selected object : move the object then
press on "Ajouter Position Objet" and give it a name, then press OK.
Update Object Position = > Used to save the new coordinates.
Replace the coordinates of the position with the coordinates of the selected object.
Force the object in Position = > Moves the object in the coordinates of the selected position.
Zone ( 3 ) : Positions Management
Remove = > Deletes the selected position.
Rename = > Allows to change the name of the position.
BACK TO THE Configuration MENU.
An anchor is a unit including 3D objects, materials and positions that we can associate to an effect (instances).
To edit a defined anchor, just double-click on it in the list.
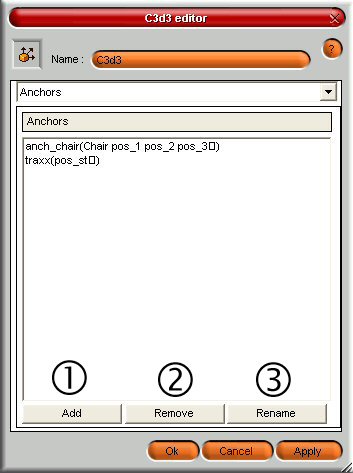
(1) : Add = > Allows to create an anchor within the C3D cell, a window "Anchor name" then appears :
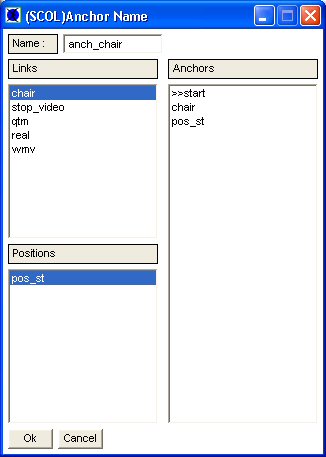
An anchor is composed of one or several links and/or of one or several positions
define in the cell :
- Double-click on one of the links elements, then double click
each of the positions that must be associated to this link.
In Anchors, we thus see >>start, the link and the positions.
- Pay attention to the links order : a double-click on a link or a position
adds it in the list Anchor UNDER the selected position.
- To remove a link or a position in Anchors, double-click on it. It will no longer appear in this list.
- Confirm by pressing OK.
An anchor is generally used with an instance : it indicates objects or positions on which instance will act. Therefore an anchor can contain objects and positions or only objects or only positions. The order in which they are placed in the zone Anchors is preserved.
(2) : Remove = > Allows to suppress an anchor.
(3): To rename = > Allows to rename an anchor selected in the list (verify instances attributions).
BACK TO THE Configuration MENU.
This rubric allows a advanced management of camera's parameters used in the 3D rendering of the module.
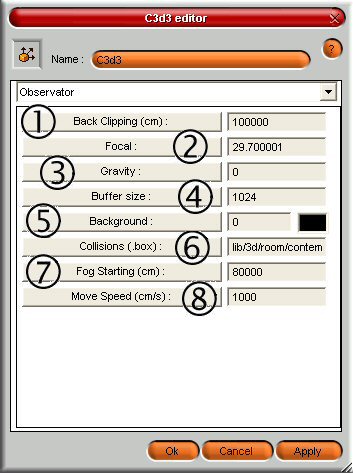
(1) : Back Clipping (cm) = > Distance (expressed in cm) from which objects disappear. By default, its value is 1000 meters.
(2) : Focal = > Define the user’s angle of view of the camera. The minimim angle is 6, the maximum angle is 85. The angle by default is 29.7
(3) : Gravity = > Affected gravity of a cell. A null gravity null (0) gives to avatars a total freedom of movement. A positive gravity sticks avatars downward, a negative gravity sticks them upward. The more this value will be important, the more it will be difficult for the avatars to counter it.
(4) : Buffer Size = > Buffer size memory ; its value by default is 1024. The buffer size is the maximal size of the 3D render. Restarting the editor is needed to take into account a new value. Increase this value if there are many faces of 3D objects in the scene.
(5) : Background = > Allows to define the color used as back color by default when there isn’t any appearing texture ; the color that is used appears in a little frame on the right. Click on this frame to change it.
(6) : Collision ( .box ) = > Calls the selected 3D scene collision box, by inclusion of the cell. The room must be centred (0,0,0) so that its collision box is well centred, also. To cancel a collision box, click again on "Collision", then click on "Cancel".
(7) : Beginning of the fog (cm) = > Distance from which the fog starts to materialize itself. The default value is 80 000.
(8) : Kbd Speed (cm/s) = > Allows to set up the camera’s movement speed within the cell. The default value is 1000 centimeters by second. The more the speed will be great, the more avatar will move quickly, and conversely.
BACK TO THE Configuration MENU.
This rubric allows to define the various effects which it is possible to implement due to plugins.
Usually, to set up an instance need to use a link or an anchor.
To edit and modify an existing instance, double-click on it
Effects are so the plugins which are placed in the
sub-file of the same name of the file ...scol\partition\dms\3d.
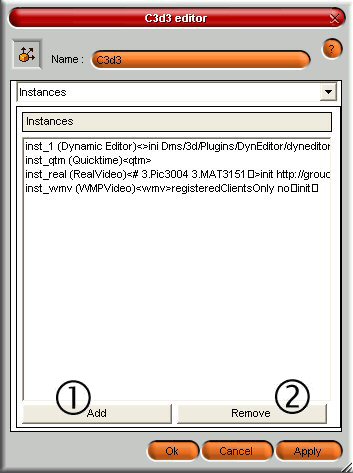
(1) :Add = > Allows to create a new instance : opens the window "Define new instance" :
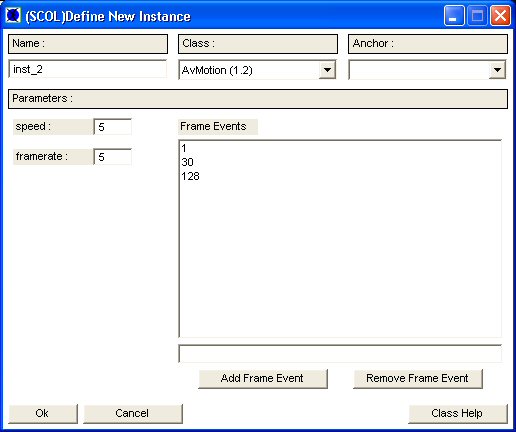
This window is composed 4 zones : Name, Class, Anchor and parameters :
- Name : allows to name the instance. It is advised to give an explicit name to each instance.
- Class : menu to choose the class of the instance ( plugin ).
- Anchor : allows to choose the anchor (or a link) associated to the
instance. An instance will apply to all objects and\or positions which compose it.
Some instances do not require the anchor assignment.
Fore further details, see help dedicated to each of them ("Class help"button).
- Parameters : edits parameters of the instance class. Contents varies
according to the needed configuration.
(2) : Remove = > Allows to delete a selected instance.
Consult the SCOL tutorial for more details about C3D3 plugins.
BACK TO THE Configuration MENU.
Unlike Instances, plugins (in this place of the C3D3 editor) are features which are loaded when launching the site and which are available for modules and/or plugins of the C3D3 module, but they are not directly visible by the user. Instances are directly visible effects when launching the site either when activating a link.
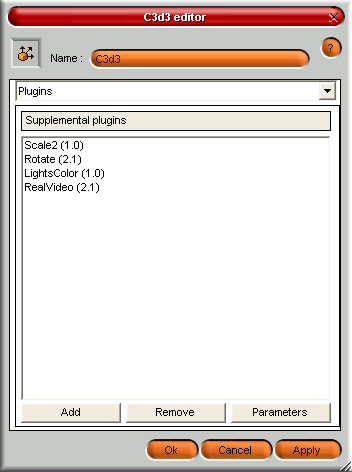
- Add : Allows to add a new plug-in.
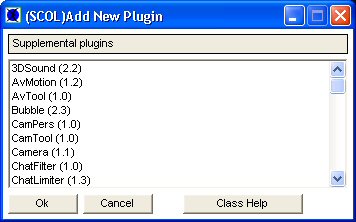
The "Add new plugin" window opens : Select the wished plugin and confirm by clicking on OK. Click on Class help to obtain their specific help.
- Remove : Allows to delete the selected plugin and to make it unavailable in the other modules.
- parameters : Allows to enter specific setups for a given plug-in plugin. An edit window opens to enter parameters.
BACK TO THE Configuration MENU.
This rubric allows to setups more C3D3 parameters to manage avatars and resources.

(1) : Name of the avatar ressource = > Defines the name of a resource. This parameter is reserved for experimented users and is used only within applications or specific developments.
(2) : default avatar = > Allows to define the avatar class
among 3 available :
- Av3d
- Snapshot
- Default (default avatar of the C3D3 module)
(3) : Accept only the default avatar = > Forces every client to use the avatar’s appearance defined by default.
(4) : Smoothing of avatars movements = > If this option is marked, only the class of default avatar (defined above) is available
(5) : Name of the rights resource = > The C3D3 module
determines the avatars’ rights this following way :
- We define under the C3D3 editor (advanced menu) the resource’s variable
managing the rights.
- When the avatar is created, we read this resource’s variable, that should have the
following format : strbuild format : Format strbuild : ((itoa commut) : :rights : :nil) : :nil
Where the parameter rights is a path a.b.c type (the dot is the separator).
The empty channel corresponds to the tree’s summit ( a.b.c is the son of
a.b).
There is a particular case : if we define in the c3d3 editor the
resources’ variable managing the rights such as ‘altern’, the avatars will
successively be placed in path « 0 » and path « 1 ».
(6) : Table size = > Allows to setup ae maximum number of avatars (512 by default)
(7) : C3D3 resources = > Allows to enter extra parameters such as the view management of 3D avatars for instance, or programmed resources.
(8) : Compute download size = > Indication for the cell designer : Allows to compute the size (in bytes) the scene to download for the clients. This one doesn’t take in account the eventual plug-ins used in the scene.
(9) : Light Base = > Determines the light atmosphere value. By default, the value is 31. The minimum is 0 (dark) and the maximum is 63 (light). These parameters can be seen only once the site is launched.
(10) : Distance of position visibility = >
Setups the user's visibility area in regard of other present avatars in the same 3D scene.
More the distance defined in the editor will be small, closer an user will see the other present
avatars. More this distance will be large, farther an user will see the other avatars.
The minimal value is fixed to 500 cms (5 metres) and default value is 50000 cms (500 metres).
This option should be used when a huge concentration of avatars in the scene is foreseen,
to improve the performances of the server and users and to optimize networks communications too.
If a site does not foresee more than about fifty avatars simultaneously, this value may be left
with a high value (example 50000 cms)
(11) : Activate system messages = > Allows to activate
or to deactivate the display of C3D3 system messages when it sends a message to the user who enters
into a 3D scene or changes his login.
This option should be used in a site when another system is used to send this
information (with a bot for example).
BACK TO THE Configuration MENU.
BACK TO Functions.
To use the various features of the 3D Editor, right-click on the wished object and material in the window ; the following context-sensitive menu appears :
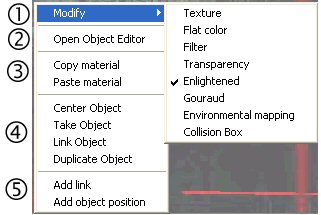
(1) : Modify = >
Texture : launches the texture editor
Flat color : Allows to affect a flat color
Filter : launches the color filters interface
Transparency : opens the transparency interface for a selected material.
Enlightened : Click if the chosen material has to be affected by the light effects
Gouraud : Smoothing effect applied to an object
Mapping environ. : Allows to create an effect of metal reflection on a material
Collision box : Click if a collision box is wished.
See the above Objects rubric for more details.
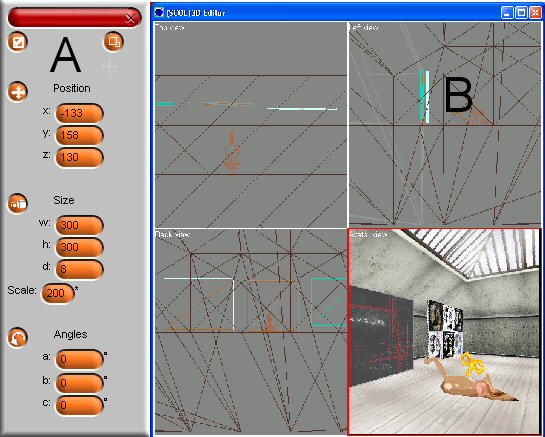
(2): Open the Object editor = > opens the object editor. It includes 2 windows (A and B) :
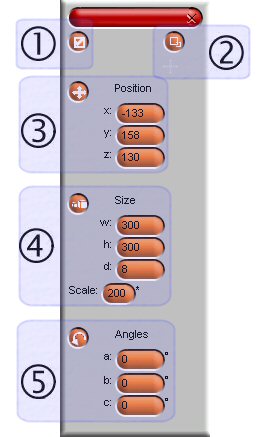 |
A - Floating menu
(1) : Displays the view without modification allowed. When this option is active, a tick is visible on the button. (2) : Switch between 1-view and 4-view (top, left, back and avatar views) and switch between global coordinates (Center) and local coordinates (main). (3) : Position of
the object = > allows to display the 3D arrows (x, y and
z) in the 3D Editor interface. Click and then move the mouse over axes to move
the selected object. (4) : Scale = > Resizes the object.
Click the axis to make stake in the deliberate scale. |
B - 3D Editor
It allows to move, to revolve , to enlarge and to reduce the objects. It is possible to move in the scene even when the X, Y and Z axes are visible.
To switch beetween the 4-views to the 1-view window, just click on the button ![]() of the
floating menu.
of the
floating menu.
Objects Movements
- When the object is selected (visible box around it), click on the button ![]() .
.
- Select one of the three axis (this one becomes yellow).
- Click the yellow axis with the left button of the mouse
- Move the object
Objects Resizing
- Click on the button ![]() .
.
- Move the mouse over the single resizing axis, which becomes yellow.
- Click the yellow axis with the left button of the mouse.
- Move the mouse towards the point of the arrow to enlarge the object or
downward the arrow to reduce the object.
Objects Rotation
- Click on the button ![]() .
.
- Move the mouse on the wished rotation axis, which becomes yellow.
- Click the yellow axis with the left button of the mouse.
- Move the mouse according to the wished rotation.
(3) :Copy a material = > Copies the selected material.
Pastes a material = > Pastes a material on the face of the selected object.
(4) :Centres the object = > Centres wireframed view on the object.
Take the object = > Prepares the movement of the .m3d file to another place.
Attach the object = > Really moves the .m3d file as child of the .m3d file of the selected object.
Duplicate the object = > Duplicates the selected object.
Reset the object : Repositions the selected object in coordinates ( 0,0,0
) ofhis father. Attention, this option can only be called by right-clicking on the father element
or child objects in the tree of the Objects rubric of the C3D3 editor.
(5) :Add a link = > Opens the "Nom du lien" window and adds this
new link in the Links rubric.
Add the object position = > Opens the "Nom de la position" window and adds this position
in the Positions rubric.
BACK TO THE Configuration MENU.
BACK TO Functions.
Open the SCS creation tree (shortcut : F6). Select the "3d" directory and double-click on the C3D3 2.4 icon.
Create required links for the project.
| Action | Function |
| Module.event à C3D3. !ChgCursor | Takes the changes of cursor into account |
| Module.event à C3D3. !addPlugin | Forces the C3D3 to add a plugin on the client (Plugin to pass as parameter) |
| Module.event à C3D3. !addPluginS | Adds a plugin on the server |
| Module.event à C3D3. !C3D positionSize | Repositions and resizes the C3D3 zoneView in the client interface. It is necessary to indicate parameters x y w and h (4 integers separated with spaces on one line) in the "Propriétés \ paramètre du lien" interface. x, y coordinates of the left superior point with regard to the left superior corner of the main document ; w, h, width and height. |
| Module.event à C3D3. !CenterOnPlayer | Centers on a given person |
| Module.event à C3D3. !ChgAV | Takes the change of avatar into account |
| Module.event à C3D3. !ChgLogin | Takes the change of login into account (typically connected with the Login x or LoginPx module) |
| Module.event à C3D3. !Control | N/A |
| Module.event à C3D3. !speak | Forces the C3D3 to display a command |
| Module.event à C3D3.broad | Allows a bot module to send a message to all the users, present in a given C3D3 module (example) |
| Module.event à C3D3.out | Gets the user out of the cell |
| Module.event à C3D3.instance.action | Generates the action of the instance (optional, according to created and configured instances). This item does not exist in the creation of the C3D3. |
| Module.event à C3D3.position | Places avatar in the position defined with its name. At least one position must be defined in the C3D3 to admit avatars somewhere. For example, shell.enter > > C3D3.POS_ENTRY. This item does not exist when creating the C3D3. |
| Event | Function |
| C3D3.entering à module Action | The starting of the client triggers an action |
| C3D3.hear à module Action | The C3D3 hears and it triggers an action whenever a message is received (typically connected with a chat module). |
| C3D3.getFocus à module Action | same (to use with COLORTERM module) |
| C3D3.in à module Action | Coming in the cell triggers an action (the customer can move and interact, but all textures are not yet loaded). |
| C3D3.out à module Action | Getting out of the cell triggers an action |
| C3D3.log à module Action | With a Log module, it allows to record the events pertaining to the C3D3 module (typically C3D3.LOG > > Log.log) |
| C3D3.spy à module Action | With a bot module, it filters the dialogs between users |
| C3D3.select0 à module Action | N/A |
| C3D3.select1 à module Action | A left click on an avatar triggers an action |
| C3D3.select2 à module Action | A right click on an avatar triggers an action |
| C3D3.select3 à module Action | N/A |
| C3D3.avatarList à module Action | Selecting an avatar in the 3D view triggers an action |
| C3D3.contextHelp à module Action | Selecting (mouse’s cursor over a link) an object triggers an action (for example, connected with an instance of the Bubble plugin). |
| C3D3.setPositions à module Action | Modifying the position of an avatar triggers an action |
| C3D3.getPlugin à module Action | Adding a plugin triggers an action |
| C3D3.getControl à module Action | N/A |
| C3D3.sendingPositionSize à module Action | Sends back x, y, w and h coordinates of the zoneView of the C3D3 |
| C3D3.instance. Evenement à module Action | An action of the instance is generated (optional, according to created and configured instances). This item does not exist when creating the C3D3. |
| C3D3.link à module Action | Clicking on a link in the 3D triggers an action. This item does not exist when creating the C3D3. |
| Zone | Function | Interface | Assignment |
| C3D3.view | Posts the 3D scene | Client | Yes |
| C3D3.info | Posts the links’ name | Client | Yes |
| C3D3.list | Posts the number and the name of people who are connected | Client | Yes |